A little known fact about Scout & Indiana is that every. single. thing that we sell is hand constructed in our studio in Arlington, VA. We press every shirt that is shipped, hand paint every jean jacket, and hand cut, pin, and sew every bomber jacket we sell. And by we, I mean me, Emily Ullo Steigler, the hands and heart behind this little company ;) The holiday shopping season is upon us so I just thought I'd take a minute to give you a glimpse into the S&I studio and the construction of our latest launch, Kids Bomber Jackets with Patches.
Each jacket is made from Black Scuba Neoprene (or Grey Wool, depending on your selection), a cotton spandex sateen (used for the lining and the pockets), and a rib knit (for the collar, cuffs, and waistband).
Each piece of the pattern (which was created by Sew A Little Seam) is hand pinned and cut to the necessary size.
From there, the lining is serged together, the pocket welt is constructed, and the outer jacket is assembled and sewn (all but the sleeves).
I have to leave the sleeves and jacket open at this point so that I can iron on the patches and reinforce them with some stitching so they'll stand up to the everyday life of our littles ;) Once all the patches are sew on in position I close up the sleeves and sides of the jacket so it starts to look like more like an actual jacket.
From then on, its all about the details - the waistband is attached, the zipper is placed, and the collar and cuffs are added.
The lining is attached and the some topstitching detail is added for that little extra something ;)
Then I give the whole piece a quality check, wrap it up, and send it out to its new owner. Each bomber jacket is constructed with lots of love and such gratefulness to be able to be doing what I love, so it's kind of like investing in a jacket that your hug your kiddo daily ;)
]]>In honor of National Quilting Month, I'm FINALLY sharing a project that I started in the fall of 2016. Not long after we moved to South Carolina, the girls moved from cribs to big kid beds (which is a whole other blog post that you should definitely check out if you haven't already!). In my family there is a long history of quilt making and gifting - each of the 8 grandchildren have a quilt made by my grandmother, and both my sister and I have a quilt made by my mother, so to help myself with the transition of my babies becoming big kids, I decided to make the each of the girls their own quilt from me. Husband and I spent quite a bit of time picking out the perfect quilt and finally settled on Elizabeth Hartman's Fancy Forest.
Fabric is important to me - I really enjoy the process of picking the perfect fabric for each quilt/project, so I decided that rather than use the fabrics recommended in the pattern, I would pick my own fabrics for the quilts. I used a lot of Cotton + Steel, Cloud 9, and Kona cottons - 99% of which came from Fabric.com. These weren't my first quilts...buuuuut at that point I could still count the number I'd completed on one hand ;) Ignorance, as they say, is bliss, and I was super psyched to get cracking at it. Needless to say, this project was much more involved then I realized it would be when I started it - figuring out the fabrics alone, much less keeping them in order, cutting, and sorting them - for two full twin size quilts - was MUCH more work than I realized it would be.
I learned a lot about the importance of being precise with your seams, not pressing too aggressively, and most of all reading the directions first... J was on TDY (temporary duty assignment) a lot over that next year so when he was traveling, I would use my nights to work on the various blocks. It was a lot of chain piecing, a lot of ironing, and a lot of ripping too :)
I was very lucky because once I finished all the blocks and couldn't possibly imagine sewing them together into the final quilt top, my mom stepped in and did a tremendous amount of work squaring my blocks up so that they would connect nicely to the strips and result in an accurately sized quilt. She's very gracious about it, but it was definitely the worst part of the whole project. She also used a local long arm quilter who did an absolutely beautiful job quilting an overall design, so I was very thankful for that as well. All in all, I did really enjoy the process - all 12 months of it! I learned a ton and I was really pleased with the outcome. The girls love the quilts too, which is pretty much all I wanted anyway :)
I used the same fabrics for both quilts, but the backing and bindings are reversed but corresponding for each quilt so they are just slightly different.
Below are some pics of how it came together and some close ups of my favorite blocks (where you'll see all the work that my mom put into squaring them for me!).
]]>
Our first blog of the new year (that started over 3 weeks ago – yikes!) is a Rad Dad Project that was inspired by one of the fastest growing trends of 2017 – standing desks! J wanted to build a standing desk for himself (that blog will come later this year), but like the sweet man that he is, he was more inspired to build the girls a fun and kid friendly standing desk first. The ultimate goal was to create a good learning and creative workspace with storage for supplies and materials as well as different modes/areas for learning and art. In one of his most creative designs yet, J incorporated a mutli-functional tabletop, a magnetic backboard, AND a whiteboard. He built it as a double desk top because, you know…twins ;) And he also designed it so it can be easily disassembled and moved since we frequently move (because, you know…ARMY).
Here’s his design notes and plans, and you’ll see how they play out over the next few pictures of the build.
He started with poplar wood because its strong and has a nice straight grain so it’s good for furniture.
First he and the girls assembled the frame of the desk and the legs.
I think the leg design is extra brilliant because adjustable so that it can grow with the kids, but also super stable.
We’re really into gray, so we knew that we wanted that to be the base color of the desk, but to make it a little more fun for the kids, we added a few fun pops of color on the inset details. We used Valspar Color Radiance for the Gray - it's a paint and primer spray that has an absolutely BEAUTIFUL coverage and finish, and we put a layer of Rust-oleum Gloss Protective Enamel just to be safe (because KIDS). For the pops of color we used Rust-Oleum Painter's Touch Multi Purpose Spray Paint in a Berry Pink, Seaside, Sun Yellow, and Grape - the colors are very bright and the finish is a perfect gloss.
The top/back part of the desk is another crazy cool design aspect of this desk. Each top is built within a box that is reversible and removable. The main board is closer to the front part of the box frame, since it is sort of like a wall to hold the magnetic and dry erase board portions. When you flip it over, the back is then recessed so there is a lip (kind of like a large tray), so it’s a great space for activities like painting and play doh that we’d rather have contained to one area.
In order to make the top/back portions of the desk reversible and removable, J drilled two dowel sized holes at the front and the back of each desktop so each of the finished back pieces can be moved to sit at the back of the desk or the front of the desk, depending on how much desk space the kids want for activities.
For the finishing touches, J cut and secured a thin layer of clear acrylic to the desktops so that the wood is protected from toddler wear and tear.
We also repurposed an Ikea TV stand from our last house to go under the desk and provide storage for all the girls school and art supplies. We added their old Skip Hop play mat so they can stand on a little padding. Oh and of course, we put a Scout & Indiana logo on some acrylic between the desks because BRANDING ;)
The girls love their new standing desk and I love that I don’t have to worry about them tripping over or falling out of chairs. It’s become a fun space that J and the girls share for reading and very important work ;) J’s currently in the design phase of his own standing desk, so we’ll be sharing that as soon as it’s done too!
]]>November is Military Family Appreciation month – it’s also a time of year that gets me thinking about what I’m thankful for. As we get ready to enter my husband’s 15th year in the Army, this year I find myself reflecting on and appreciating the importance of my Military Family as it has existed and grown throughout this time. I’m so truly thankful for the many wonderful people who have so importantly impacted my life as an Army spouse and who have become my Family through so many moves, so many states, and so many different times in our lives.
When my husband was commissioned out of college (a few years before he became my husband), I remember thinking that it wasn’t that big a deal and that he would do his 4 years and then we would move on with our lives. In fact, in my early college years, I had, in fact, SWORN that no one would ever ‘welcome me to the Army, ma’am. Fast forward to the obligatory saber slap on the bustle of my wedding dress and there I was – becoming a military family. It was a bit of an adventure as we prepped for the beginning of our life together, anxiously awaiting his orders to find out where the Army would send us. We had decided we were going to go BIG and kick this thing off right with a tour in Europe. Buuuuut…it unfortunately lined up with the kick off of the Iraq War troop surge so needless to say, a month before we were married we found out we were NOT going to Germany, but rather Fort Campbell KENTUCKY…where he would deploy for 15 months just 3 months after we were married. It wasn’t exactly what we’d planned, that’s for sure, but as it turned out it was exactly what I needed to really understand the importance of my Military Family.
My fondest memories of Fort Campbell are by far the amazing group of women that I met and formed life long bonds with there. I moved there knowing only my husband and one of his friends, but during my time there, I formed some of the best friendships and support systems I have ever known. Our battalion commander’s wife and our unit’s FRSA (Family Readiness Support Assistant), remain, to this day, two of the kindest and most caring people that I’ve ever met. They welcomed me with open arms and taught me how to be a good and supportive wife to a soldier but also really helped me come into my own. They taught me how to be apart of the big dysfunctional family that is Army spouses and how to appreciate and learn from each and every experience, good or bad, that I had in that role. I was also lucky enough to meet a group of dynamic women and amazing friends who loved me for me and gave me a support that I didn’t know was possible, especially during such a hard time in all our lives. Together, all these women were some of the best friends I have ever had and I am so thankful for the family we were during that time, and probably are still today. These women hands down made me who I am as a military spouse today, but they also really influenced who I became as a person, and that’s something that I’ll never forget.
As time has gone on and my husband has gone through multiple MOS (Military Occupational Specialty) changes, our Army experience has changed quite a bit. We aren’t as engrained in the Army family as we were when we were part of the massive constantly deploying Brigade Combat Team environment. With every job J has though, and every new state/station we live in, we continue to meet some of our best friends through the military. They are the people that you have holidays with when you can’t get home, who are there for you when you are sick or having a baby and your family is really far away – in short, they are the Family we choose, and there’s something really beautiful in that.
These days, we aren’t even stationed at an Army post, but as I have embarked on this new journey of small business ownership and occasional blogging, I have found a whole new aspect of the Military Family – and that is the online network of amazing military spouses who are blogging and making it work while they move all over the world to support their service members. The amazing thing about this is that even though I have never met most of these women, we share this bond of a shared experience in Military Life and they have been so supportive and encouraging and I find myself again overwhelmed with gratitude for these relationships made possible by this sometimes crazy military life. A special shout out to Allison of Project Motherhood NYC, who has featured some of our tees on her beautiful children with messages of female empowerment, gender equality, and recognizing the strength within us as mothers. A very special shout out to Justine from It’s Always Sunny in June – who is just the absolute coolest and realest ever. She and her amazing family truly do stand out in the crowd… and they make our clothes look SO GOOD – I’m so thankful for her support and so happy to be working with her.
Military life isn’t the easiest for the military family, but the military is a very big and very special community that I’m proud to be a part of. This Thanksgiving and Military Family Appreciation Month, I’m especially thankful for the family that the military has brought to me.
]]>Halloween is so much more fun with kids and since this is the first year the girls can really weigh in on their halloween costumes, I thought I'd see what they wanted to be. So we talked about all the options, from book characters, to movie characters, to just things/people they think are cool. No matter how many times we talked about it, their answer was always the same - FLAMINGOS. Both of them. FLAMINGOS. Which honestly, although totally unexpected, I find completely hilarious, so sure I thought, FLAMINGOS. But....as it turns out, finding toddler flamingo costumes is a little more difficult than you might think (or maybe not, I'm not sure how many 3 year-olds are demanding to be flamingos... I didn't love any of the options though - in form or function - so I decided to make them myself. And, I love them even more than I thought I would, so I thought I'd share my DIY tips for this simple but super cool costume.
So the key element to this entire costume is that its made out of a hoodie - this way it's not hard for the kids to wear it and it will also keep them warm. I love American Apparel kid hoodies - and I knew I wanted this NEON PINK one for the flamingos because NEON PINK. As a side note, a hoodie also serves as a great base for the wings and the beak so you don't have to worry about a bunch of separate parts that toddlers will most certainly lose/break/destroy all within a 5 minute time frame.
For the wings, I bought two different color felts at Joann's - the piece for the wings I bought the color below by the yard (since I had to make two costumes I bought 1/2 yd). First I cut two large wing shapes to connect the feathers to, with the idea that the final wing would then connect to the back of the hoodie (on the back and arms).
I used the left over pieces of this base wing color to cut some feathers. I bought a second color felt by the sheet (I bought 2 sheets per costume) to add a little dimension. Also, for what it's worth, the bottom part of a flamingo's wings are darker...and realism is obviously important when making felt flamingo wings...for a three year old...for halloween ;) To make the feathers, I just cut a simple feather shape and then cut some breaks in it to mimic the breaks in real feathers.
Once I had enough feathers cut out, I layered them on the wing, pinned, and sewed them on so they looked even more like feathers. Plus since they were connected by that line down the middle, they laid a little more realistically too. I could definitely have glued them on with a line of glue down the middle of the back of the feather and drawn the line on with a pink or black sharpie though, for sure.
When both wings were finished, I hand stitched along the top line of the wing to connect the wing to the hoodie. This left it free to move with the arm of the hoodie and frankly looked pretty awesome once the kids tried it on.
I thought the flamingos also needed some feather volume on the bottom and although I'm definitely not a tutu girl, I felt like it was definitely the right way to go. I used this awesomely easy tutorial that I found on Pinterest. It basically requires looping precut strips of tulle around elastic measured to fit your child's waist. I only ended up using 3 rolls of 6 inch x 25 yards per tutu and I layered the top to be lighter and the bottom darker because you might as well do it right, you know?
Last but not least, I added the flamingo's eyes and beak to the hood of the sweatshirt. We are obsessed with googly eyes in this house, so we glued these on a circle of black, which I then stitched to the side of the hood. Then I cut the beak out of two shapes made from the pink and black felt and I sewed them together and then to the hood. I set the beak back a little from the edge of the hood so it wouldn't hang down in the kids' faces. I also left it an open piece of felt so it wasn't too heavy.
Here's the whole thing put together - stay tuned for pics of the full costume in action next week!
]]>
I am notorious for my black thumb, which is why it was surprising to everyone, especially me, when I decided that I wanted to try my hand at a garden this summer. It all started when my Mom sent the girls a little seed starting kit in early spring. It came in an egg carton and was filled with six different types of flower seeds, the soil to plant them, markers to identify them as they grew, and a paper and pencil to track their growth over time. Here’s the one she got us - the Kaleidoscope Flower Garden, but it turns out they come in all kinds of fun varieties!
To be honest, I really didn’t expect much mainly because I’ve tried to grow seeds before and I either forget to water them completely or I shower them with attention and inadvertently overwater them… either way they die. But the kids were so excited that they watered them consistently and fairly appropriately daily as soon as we got home from school. Sure enough, in only about 5 days, the seeds germinated and started to grow. It was amazing – and they were soooo excited and involved in the process over the next few weeks that I wanted to give them more, so we decided to start some vegetable seeds – pumpkins, cucumbers, carrots, and beans to be exact. And they grew!
So we decided to start a garden. J, of course, did a bunch of research on the best way to go about building a garden and our initial plan was to keep it small. We bought two round galvanized metal tubs that way we could keep the garden mobile since we didn’t really know what we were doing and were worried we would pick a spot with too much or too little sun. I still think that would have been a really great idea…had we not gone to Home Depot to get them and walked through the Garden Section first.
We went to get the tubs and some tomato and pepper plants - that way the kids had some bigger plants in case the seeds didn’t pan out. However, some of us (ME, it was ME!) got really excited about all the vegetable options they had, so we ended up coming home with tomatoes, peppers, artichokes, beans, asparagus, sweet potatoes, watermelon, oregano, and thyme… At which point we decided that we needed a bigger garden. We ultimately referenced this article and built a raised bed. We got the kids some cool gardening equipment and got to planting.
I definitely overcrowded my plants (go figure) and even though my mom (who is an avid gardener) came and did some rearranging/thinning for us, we did end up losing most of the carrots, the thyme, and the oregano. But we did end up with tons of beans, tomatoes, and cucumbers which is pretty much the coolest thing EVER.
The kids like to come home from school, go see what they can pick in the garden, and then wash it and snack on it.
They ate an entire yellow pepper this week. We’re pretty excited to see what happens with the sweet potatoes and the WATERMELON! We have two tiny watermelons that I’m really hoping grow up. Fingers crossed!
So anyway, this post is definitely not a ‘how to’ of gardening…in fact, as soon as I get done writing it I’ll be googling ‘how to know when your sweet potatoes are ready to harvest’. BUT I will say that it was been a really fun experience and a great activity that not only kept them occupied for reasonably long periods of time but also got them really engaged in their dinner and specifically their vegetables. So, if you too have a black thumb and are on the fence about trying your hands at a garden with your kids, I say GO FOR IT! It's a great experience and they honestly would have been happy even if we had only gotten one bean
]]>
Continue reading "national ice-cream day: mint icecream recipe!"
]]>Continue reading "S&I custom upcycled t-shirt dresses: the making of!"
]]>
One of the things that I found the most daunting in switching my babies to solid foods, was determining how much I should be feeding them so they were getting enough nutrients to grow up with a healthy metabolism as well as a broad palette and appreciation and joy of eating good food. I think underfeeding or overfeeding their child is a fear of most of us mothers have experienced during this transitional time. A good friend, who is also a mother of twins and understood how overwhelmed I felt at the time, sent me a chart created by Stanford and Philadephia Children’s Hospital, that was incredibly helpful. So I took that information and distilled it down into a pretty visual guide so it's easier to understand on the go...and more fun to look at This is the last segment of our March National Nutrition Month blog series on making first foods for your babies and I hope you've enjoyed it. You can download the individual jpgs below! Feel free to pass them to moms you think might appreciate them, and if you repost, please just remember to credit us/link to us!
]]>It’s really easy to get discouraged when you are transitioning your babies to solid foods and even more when you start trying to give them different types of food. One thing that I heard over and over in the course of transitioning the girls to solids was that you should let your kids try new foods many times before deciding that they don’t like them. That is much easier said then done though – there’s nothing worse than feeling like your baby is unhappy with their food or isn’t eating enough. That being said, one of the most interesting things about twins is that you get to have two entirely different reactions and experiences at the exact same time. So this week’s blog is basically sharing that experience with you in hopes that it will help you in your journey to help your littles develop a healthy diet. Below I’m sharing a video of the girls’ very first bites of solid food. It wasn’t necessarily warmly received, as you’ll see, but Indiana gave us hope. Thank goodness we didn’t start with Scout, who got violently angry and vomited – honestly this might be a different blog But my hope is that whether you have a Scout or an Indiana, this will help you to not get discouraged or lose hope! Your kiddos have to learn to eat and appreciate food just like everything else and they will totally go on to have full and healthy diets!
In follow-up – after only a month, this was Indiana eating sweet potatoes, her absolute favorite food to show you that showmanship is certainly not lost on babies
And as for Scout, who so aggressively hated her first bite of solid foods, within months she loved not only her rice cereal, but a multitude of vegetables like spinach and beets too!
Those first reactions to food were repeated again and again as we tried new foods and new textures but ultimately through repetition, trying foods different ways, and sheer orneriness (on my part), I’m happy to say that the girls eat and love a very wide and eclectic variety of food;)
]]>There were two things that I struggled with the most when I was making the girls’ baby food. The first was finding my groove in regards to making the time to make food at all – and the second was coming up with fresh ideas/recipes to make so that they had a good variety of food.
So, first – TIPS TO MAKE TIME TO MAKE FOOD:
RECIPE/FOOD MAKING TIPS :
• The basics – For all the reasons outlined above, as well as in my last post, I think the easiest way to make your own baby food is to bake or steam your veges first, puree them in a blender, and then store what you need fresh and freeze the rest in small cubes that you can use as needed.
** Misc note** – I actually cooked all my fruits as well because raw fruits and nuts make my husband’s mouth itch and we were worried that if the kids had a negative experience with them, they wouldn’t want to eat them. Fun fact – there is an actual condition called oral allergy syndrome (that’s definitely not made up by one’s husband in collusion with his brother to convince their mother their whole childhood that they couldn’t eat fruits – not that I ever thought that in the early years of our marriage…JUST KIDDING and I will NEVER live it down – anyway – oral allergy syndrome causes an allergic reaction to proteins in certain fruits, vegetables, and nuts. Because the allergy is to the proteins, we find that if I cook the fruits (bake or just heat on the stove top), it changes the structure of the proteins so J’s body doesn’t get mad and make J’s mouth itchy. We eventually moved the kids to raw fruits, vegetables, and nuts in the toddler years and haven’t had any problems.
• If you need to speed up your cooking time, cut your vegetables into smaller pieces – Not only will they cook quicker, but they will be easier on the blender.
• If your purees are chunky – add more fluid! It took me FOREVER to learn this, but 9 times out of 10, if my purees weren’t as smooth as I wanted them, I needed to add more fluid (breast milk, water, regular milk, almond milk, coconut milk, chicken broth, vegetable broth, etc). The 10th time btw was when I didn’t cook my food enough before I put it in the blender
** Misc note** – If you are feeling frisky, you can actually make your own vege broth too. As you cut up veges during the week, you store the parts you don’t eat in a Ziploc bag. Then at the end of the week, you boil them in some water, strain them out, and you have your very own homemade vegetable broth. It’s kind of cool too because the flavor fully depends on what veges you collected during the week! It's also a great way to get your $$ worth out of those organic vegetables That’s a tip from my mom btw – so shout out to her
• Freeze single foods in cubes if you want to experiment with food combinations. If you have just apples in cubes – you can see if your little likes them with bananas, strawberries, greenbeans, etc – the possibilities are endless! If you have a magic combo that is tried and true for your little, then freeze cubes of the mix – it will save you time at mealtime!
• Go to the Pros! There are a lot of really talented chefs out there with nutritional know how and great recipe ideas for baby food. Here are two of my favs and why:
1. Weelicious - My sister actually started me on this site, but Catherine McCord recipes are all about starting your kids on a variety of healthy foods. She has really fun recipes for little ones from babies to toddlers to kids. One of my favorite take aways from her I read in the opening of one of her cookbooks – she basically said that just because you don’t like a food doesn’t mean that your kids won’t like it. So you should give them a variety of foods (even ones you don’t like!) a variety of ways and do it multiple times before you decide that they don’t like it. As a side note, I’m currently obsessed with her Smoothie Project, which you should totally check out too (it’s a great way to get fruits and veges in toddlers).
2. Baby Foode - I loooooove this site and blog for soooo many reasons, the first might be because I really wanted my kids to be baby foodies so the name really spoke to me But she is a big believer in using spices in baby food – I liked that idea and more importantly, my kids LOVED it. Except for curry – they were not huge fans of curry. But Michele, who started the site, has really cool food combos and recipes. Also her site breaks down recipes by age group so easily, its brilliant. She’s also added some really great resources (cookbooks, supplies, etc) so now it’s kind of a one stop shop too!
Most of all – HAVE FUN! Play around with different food combinations and cooking styles because it is truly SO rewarding when you find something that your baby LOVES! And you might be surprised what that food is! Stay tuned next week for some free downloads on what foods you should really try and don’t have to buy organic!
]]>
March is National Nutrition Month, which seems as good a time as any to kick off our blog series on making your own baby food and starting your littles out with their best fork forward. I will preface this by saying that I am by no means a nutritionist or a chef, but I do LOVE food – like GOOD food and I was lucky enough to grow up with the benefit of delicious home cooked meals, so that is what I know. My mother was, by all accounts, kind of a crazy person about what I ate as a baby – she was all about no salt or processed sugars before it was even cool. I definitely didn’t fully value it when I was a kid, but now as an adult I definitely appreciate that I grew up healthy, with a good metabolism, and an appreciation for meal time. That last part was one of the biggest reasons that I decided to give making my own baby food a whirl too honestly – I just couldn’t bear the thought of having to make two separate meals for kids v. adults, or even moreso, the thought of kids who would demand stereotypical ‘kid meals’ like mac and cheese, hotdogs, etc and turn their noses up at really good and delicious foods (I know, a little snobby, sorry!). But enough about that, there are a million sources of information that tout the benefits of healthy eating – like www.eatright.org, where you can read up on why good nutrition is important and find a whole bunch of blogs on the topic.
SO, in the sea of blogs about this topic, the reason I wanted to do my own blog series about making baby food is that I think a lot of people assume they don’t have the time or skill set to do it so they dismiss it as an option. I mean, I think the idea of making all your baby’s food…while taking care of your baby…AND trying to do anything else (like take care of the rest of your family, work, etc) can seem really daunting. I always feel like I have to explain why I chose to do it or somehow justify it because I had twins and a full time job when I was doing it, and people honestly thought I was crazy and/or a full on healthy nut. And I’m not really entirely either of those things, I swear! I like to think of myself as pretty down to earth and chill about most things actually (I know, I know – if you know me, feel free to insert the joke of your choice here). AT ANY RATE – my personality is to research EVERYTHING, but then believe NOTHING So basically, I need to learn for myself what for sure works and what doesn’t, and most importantly why. SO, that’s what I hope other parents will find helpful about this series – notes on how to reasonably do this as an everyday working parent and tips to make it easier/more achievable – all juxtaposed with some anecdotes on what NOT to do
To get you started, here is a list of basics you will need to make your own baby food…and why you need them (because ME)…
A GOOD Blender
I used a Ninja because it works well and is affordable. I would consider selling a kidney for a Vitamix, but it just wasn’t a justifiable expense for us at the time. You need a good blender because smooth food puree consistency is really important, especially in the beginning. Apparently going from only breast milk or formula to solids can be shocking – who knew (I had one kid who didn’t care so much and another kid who acted as if I was trying to choke her (and then vomit) if there was even one chunk in her puree initially. More on that and tips for getting your purees smooth later).
Storage containers
These are important to have for both the refrigerator AND the freezer. I’ll focus more on the freezer storage because I found it completely untenable to make my kids’ baby food fresh by the meal and by the day. Freezing it in single food cubes allowed me the flexibility to pull what I wanted for the day out of the freezer in the morning before I started work so that it was defrosted by the time the kids were ready to eat it. A lot of blogs advise using an ice cube tray to freeze your baby food, which will totally work! I opted for these Tovolo trays for a couple of reasons: 1. They are small/compact and easily fit in your freezer with a lot of other things 2. They make 1 oz cubes so it’s an exact measurement, which was important to me. Once I took the cubes out of the trays, I stored them in freezer bags to prevent freezer burn (although with twins I can’t say I ever really had to worry about food being in the freezer too long!)
For the refrigerator storage I used these Littleware Baby Food Storage Containers because I could fit two cubes in them, which was the serving size for one meal for one baby. That made it super easy for me to prep the meals for our nanny and it was super easy to separate out by day/meal, etc. They also easily fit in a bottle warmer, which was handy in case they didn’t defrost fast enough (or I forgot to pull them out of the freezer altogether – whoopsies) I do have some mom guilt that I used plastic though, so if I had to do it again, I would likely use small glass containers – like these mason jars.
A small spatula
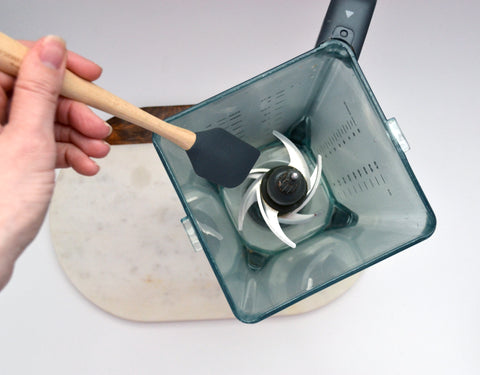
This one might seem a little silly or unnecessary, but it made my life a lot easier, which is why I included it here. The size of this spatula make it really easy to get it in and out of the blender, which is nice. Even more importantly, it’s the perfect size for getting the pureed food into the ice cube trays. I found regular sized spatulas to be a little cumbersome for that and therefore messier. I got this one at Target because I like their color options best
A flat metal tray with an edge
I baked almost everything for a several reasons – taste, ease, etc (again, more on that later), and a tray with an edge is KEY. That way any oil or juices from whatever you are baking won’t run off and make a huge mess. I use these Noricware Natural Aluminum Baker's Half Sheets.
Parchment paper
I HATE washing dishes so I ALWAYS cover my trays with something to avoid having to scrub them later. A lot of the recipes I used called for parchment paper, which I thought was ridiculous until I realized the true gloriousness of its potential. In that nothing sticks to parchment paper – where as it will stick directly to the pan or aluminum foil. And going through the trouble of baking something just to have to leave half of it on the pan or toss it with your aluminum foil is THE WORST. So seriously, do yourself a favor and use parchment paper, you’ll thank me
In the coming weeks I’ll be sharing some more tips on making food and some free downloadables for what foods to start when, how much to feed, and meal plan sheets, so stay tuned!
]]>
Sooooo Valentines Day. Honestly - it's not even my favorite fake holiday (THAT would be a tie between Treat YO SELF Day and National Taco Day, for the record). This is the first year that our kids have had to hand out Valentines to friends, and I really wanted to make some super cute and clever ones for them to hand out at school. Buuuuut, I kept coming back to these ridiculous 'Roses are Red' poems which are way more my jam. So without further ado, here are this year's Scout & Indiana Valentines (which will NOT be handed out at the kids' school) - for all the mother fathers, the taco lovers, and the special friends who we don't always agree with but love anyway (and who we ALL have at least 1 of this year!). Download this free set of 5 Grown Up Valentines below!
]]>Continue reading "mini rogue rack: functional family fitness part 1"
]]>This will be a two part blog – this week I’ll be talking about our philosophy on how fitness keeps our family functional and how J built this rad kid’s version of our Rogue Fitness Power Rack.
I’m not necessarily huge on New Years resolutions, but a new year is certainly a good time to re-evaluate what worked for you and what didn’t in 2016 and health goals are something I think we all think about – especially after having kids. Fitness is and always has been important in our family for a multitude of reasons. My husband and I started working out together regularly just before I got pregnant and that time has become an important time for J and I to reconnect (and now that we have the girls - also to get to have an uninterrupted adult conversation ). When we lived in Virginia, we had a really great workout routine and fantastic childcare, so two nights a week we were able to go out to a gym and then have a post workout smoothie date night. That was awesome but moving to South Carolina shook things up a bit because we don’t have as great a childcare setup and our lifestyle changed a little bit with work/commute, etc, and we just weren’t sure where that workout time was going to fit into the day if we had to leave the house to do it. We ultimately decided to invest in a Rogue Fitness Power Rack and some other cool toys (a rower, some kettle bells, dip bar, wall balls, etc) which has actually turned out to be even better since we now work out in the garage five nights a week after the kids go to sleep. While this might not work for everyone, it has been really great for us – we feel better physically (and let’s face it, we look better too) but also mentally since it’s a chance for us to talk through the day and the things that pop up that we can’t always talk about with munchkins running around (ESPECIALLY now that they are basically like having two pet parrots ).
Since we have the equipment at home now, the kids were getting curious about it, especially once they saw us using it on weekends while they were heading outside to play. That got us thinking that it might be a good time to introduce them to the idea of fitness and make it a family activity. Once we caught them doing squats with their toy broom and mop in the living room, we knew it was a definite go. So crafty husband who is really good at things like MATH, LOGIC, and building stuff, among other things I should have paid more attention to in school – drafted out a plan to build the kids their own mini rack. J designed the rack by scaling down the measurements of the original Rogue version. Taking into account the fact that we move a lot (and also have a lot of stuff), he decided to design it so that it could easily be taken apart and put back together quickly. We figured that would help with storing it when we are here and also moving it to the next location. In an awesome stroke of fate – it turns out the extra lumber we had lying around was perfect for this project, so he only ended up buying a couple new things – like the pull up bar, attachments, dowels, and the bolts for easy assembly.
Another cool aspect of this project was that once J had all the pieces cut and the other more kid dangerous things finished, he taught the girls how to measure and sand the wood. They LOVED that and got so into it that he ended up getting them their own measuring tape for the next few projects (stay tuned) and for Christmas they even got their own workbench. Below are some pics of the mini rack and its aseembly/testing phase – next week I’ll share the painting, final touches, and teaching the kids to use it!
]]>Continue reading "mini rogue rack: functional family fitness part 2"
]]>To kick off Part 2 of our Mini Rogue Rack: Functional Family Fitness blog, I thought I’d give you some details about the finishing touches of this rad rack. When all was said and done, J actually built this rack in a weekend, but it did take a little longer to finish with painting and details. After he had the whole thing assembled, he essentially sanded the bejesus out of all the edges so there were no sharp edges - you know toddler heads and sharp/hard edges and all. Once the sanding was done, J painted the main rack with Rust-Oleum Lacquer Spray in Chinese Red so that it had a little shine to it that more resembled the metal Rogue one. We stumbled across Rust-Oleum FlexiDip and felt it was just too cool NOT to use, so we decided to put on the pull up bar to protect their tiny hands. He finished the pipe safeties and J cups in Black Rust-Oleum Lacquer Spray. Then just because we are ALL ABOUT branding here at S&I, we decided to deck the whole thing out with Scout & Indiana logos – for that we used Cricut Outdoor Vinyl (black and white) and Cricut Adhesive Foil Stainless (Silver). The J cups weren’t actually screwed into the final rack until everything was dry and we could measure the girls height and place them properly. For the barbells and weights, we used dowels and left over plywood and for kicks we decided to paint the weights in Rust-Oleum Chalkboard Spray so that we could write on them.
Of course we had to break it in right away, so here's a sampling of the exercises we've started teaching the girls
SQUATS
PULLUPS / MUSCLEUPS
So if you looked at the above pictures closely, you're probably a cross-fit expert by now - YOU'RE WELCOME JK - obviously we have some more practice to do, but it's a great way to get the kids started on understanding the importance of health and fitness as well as the importance of doing things together as a family If you are interested in making your own mini Rogue rack, don't hesitate to email us and we'd be happy to provide you measurements, specs, and details of this project!
]]>
Christmas is only a couple of weeks away y'all! If you're like me, you generally wait to wrap all your presents until the week of Christmas...then grossly underestimate how much time it will take, freak out and panic around 11 pm the night before you need said gifts, and ultimately quickly tape some stuff together and call it a night. I have no experience with this, just an active imagination We've got your back this year though - not only will our adorable (and FREE) christmas tags make you want to start earlier, but they will also help you look like you totally have it together (even if you put these on the packages 10 minutes before you gift them ) We made some easy to use and/or modify punny gift tags as well as some cute gift ornaments to jazz up your boxes. You can download these printable PDFs, scale them as you see fit, and sprinkle your gifts with some holiday cheer. I played around with some different kinds of paper, glitter, and foil because I felt like a little BLING this year, but GO NUTS - and please tag us on IG and FB so we can see what you come up with!
]]>Continue reading "5 tips for taking good holiday card photos of your littles"
]]>I feel like everyone has that one favorite thing that they love about each holiday - for me, it definitely pumpkins for Halloween, but come Thanksgiving I am all about that hand turkey life. I can't explain it - I mean I definitely love Thanksgiving food, but there's something about drawing hand turkeys that makes me truly happy inside. Honestly, I made a huge deal about it each Thanksgiving long before I had kids. For example, see below, where I made my husband draw and send pictures of hand turkeys while he was in Iraq for our first Thanksgiving as a married couple. I'm thankful that he's such a good sport about these things
Happily, people find my prolific hand turkey drawing a lot less weird now that I have kids, and last year was the first year that I got to help the girls make their very first hand turkeys. They were obviously naturals
This year though, I decided to kick it up a notch...because ME But also because the only thing better than a hand turkey is probably an edible hand turkey. Obviously. So, to kick off this clearly genius plan, I used Martha Stewart's Sugar Cookie Cutouts Recipe - because I felt pretty sure that this project would be Martha approved. I doubled the recipe outlined at the above link, so here's what I used:
Ingredients
4 cups sifted all-purpose flour
1 teaspoon baking powder
1/2 teaspoon salt
1 cup (2 sticks) unsalted butter, room temperature
2 cups granulated sugar
2 large eggs
2 teaspoons pure vanilla extract
Her instructions are to put the butter and sugar in the bowl of an electric mixer fitted with the paddle attachment (I swear by my Kitchen Aid - which was a wedding registry gift btw, just so you don't think I'm a baller). Mix on medium speed until pale and fluffy, then mix in the eggs and vanilla. Reduce speed to low and gradually mix in the flour mixture. Divide dough in half and flatten each half into a disk. Wrap each in plastic and refrigerate until firm, at least 1 hour or overnight. I definitely didn't follow the directions for that last part in that I'm literally just now seeing that for the first time. I put my whole ball of dough in the refrigerator in the bowl for about an hour and a half while the kids took a nap and it worked out just fine. Once you are ready to roll the cookies out and create pure awesomeness, you preheat the oven to 325 degrees with racks in the upper and lower thirds (which I like to say I did and by that I mean, that's just how the racks were already arranged so gold star for me ;)). Martha has some detailed instructions about how to roll these cookies out, but I just put them on a clean silicon mat and rolled them to about 1/4 inch (or slightly thicker).
Then, I had each kid put her (clean) hands on the dough, and I traced the outline of the hands with a skewer. The silicon mat came in real handy because it was easier to move the dough around the table so each kid could get a turn. It was also helpful because after I had the hand outlined traced, I could move the dough out of the way and cut the actual hand out using a light touch and a paring knife.
Once I cut around the outline of the hand with a paring knife, I used a thin spatula to move the whole cookie to a baking sheet.
HELPFUL TIP - If hypothetically of course, you have to leave one kid unattended for 5 seconds to take the other one to the bathroom, make sure that the unattended kid is not close enough to the cookie sheet to help herself to an entire finger while you are gone...
Once all the cookies were on the baking sheets, I baked them 15-18 minutes and let them cool completely on wire racks. As you can see, there wasn't a lot of spread when these cookies baked, which is why they are perfect for this ridiculous project:)
Then came the real fun. Martha Stewart has a recipe for Royal Icing for sugar cookies, which you can find here. It looks amazing, but I'm not going to lie to you and tell you that I'm some kind of baker who just has meringue powder lying around. Nor was I going to whip up some egg whites. So instead, I whipped up some confectioner's sugar, milk, and vanilla into icing right quick using the icing portion of this recipe from Epicurius, which I used because frankly I had all the ingredients and also because vanilla in my icing sounded divine. Then things really got crazy when I broke out my Wilton Performance Color System not just because it makes me feel like kind of a big deal but also because the colors you can make with it are really cool.
I mixed up some classic Thanksgiving/Fall turkey colors and then let the kids pick the color of their turkey feathers while I iced them (which your kids could totally do if they are older). Once I iced their hand turkey, the girls got to select their sprinkles and go to town on that poor turkey (with some assistance of course so the entire floor wasn't sprinkled as well). I put the cookies on a plate in hopes of catching most of the extra sprinkles, which worked pretty well actually).
All in all, they definitely aren't Martha Stewart quality, but they were hella fun to make...almost as fun as watching people awkwardly eat them - hahahaha
]]>I always feel like November kicks off seriously good food time of year, what with Thanksgiving just around the corner and then the full on holiday season. Growing up, food was always an important element of our home life – making good food, eating good food, talking about eating good food… Despite the many changes throughout the years, one thing has remained steadfast in my parents’ home, and that is Pasta Sunday. Some of my favorite memories as a child, and as an adult honestly, are of making pasta with my parents. Cooking with my kids has been one of my favorite things about parenting so far. And yes, it is 100% messier and slower with four tiny hands involved, but they really enjoy it, which I really love. I’m also hoping that someday it comes full circle and they cook for me
Recently, we had a chance to do a true Pasta Sunday with my parents and the girls for the first time. We started simple and made pappardelle but it was an awesome family activity that everyone loved and certainly made for some great memories (and pictures!). Although Dad had to deal with some C list pasta shapes, it definitely went better than expected and since then we’ve even been bold enough to make tortellini (which as it turns out, Scout is awesome at!)!
So here’s the overview of dad’s recipe and instructions as (mostly) followed by us.
Pasta Recipe:
2 cups all purpose flour – although for a lighter dough/better texture, which dad prefers, you can substitute 1 cup of semolina flour for regular flour
½ teaspoon salt
1 tablespoon olive oil
About 1 cup water
Dad likes to mix the dough directly in the food processor, but we don’t have one, so we just used the Kitchen Aid with the dough hook, which works great too. Once a ball of dough is formed, stop the mixer (or food processor) and cover the dough with a cloth, letting it rest for 20 minutes. At this point if the dough feels wet, add a little flour, but if it’s too dry, add a splash of water.
After the dough has woken up from its power nap, you start rolling it out. Apparently the old Italian mammas did/do this with a rolling pin, which is bananas. I tried it once and the result was an unfortunate belly bomb. Which is why we now use the kitchen aid attachment or those pasta machine roller/cutters that you attach to the counter. Before the dough ball is ready to make its debut in the roller though, it has to lose…like a couple of inches. So we cut the dough ball in half and thin it out a little by hand.
Once the dough is thin enough that you can send it through the roller, you start at the roller’s thickest setting (1), and keep sending the dough through until you get to the 4 or 5 setting.
Once the dough is pasta noodle thin, you can do whatever you want with it really – cut it up as pappardelle, send it through the cutting attachment to make fettucine, or fill it and cut it into shapes like tortellini or ravioli.
To store it until you are ready to cook it, place a thin kitchen towel (like a flour sack towel) on a flat cooking sheet and sprinkle it with flour before you lay the pasta on. We usually don’t let it sit for more than about ½ an hour before we make it (that way it doesn’t get too hard, etc).
When cooking the pasta, it’s best to cook it in shifts because it’s so thin and delicate that it only takes about 3 minutes or so to cook. So if you cook it all at once, the pasta on the bottom gets overdone and is gushy. The awesome thing about pasta is that you can top it with almost anything – our go to is red sauce with meatballs, and our munchkins were definitely all about that life…they gobbled up this meal in about 10 minutes, which is definitely a toddler world record!
]]>Or pumpkin muffins - for all you non-2-year-old-gibberish-speaking mother/fathers Anyway, I know that last week I posted a pubic service announcement on how to NOT be a basic witch, but I must admit, every fall, as the temperature drops, so does my pH in that I go straight BASIC about pumpkins. I would honestly probably buy pumpkin spice deodorant if they made it (do they?!?)...maybe...probably...okay definitely... Anyway - this week I'm sharing a recipe made possible by Pinterest, by way of the TGIF: This Grandma Is Fun! Blog. Which is a pretty cool blog btw, so I'd recommend checking it out in all your free time
When they say they are the best pumpkin muffins ever, they really aren't kidding - they are super soft and flavorful. The kids completely flip out about them (hence the title of this blog, which is a phrase that gets screamed at the dinner table at least twice a night). Anyway, you can check out the full recipe and write up here, but here's the basics for you:
PS. They are extra amazing when they are still warm out of the oven!
]]>
Continue reading "googly eyed pumpkins: pumpkin decorating tips"
]]>